How to Lay a Simple Paver Patio or Walkway: A Weekend DIY Guide

A simple paver path or patio can completely transform your outdoor space, turning an unused patch of lawn into a beautiful, functional area for dining, relaxing, or gathering around a fire pit. A DIY paver patio is a rewarding weekend project that adds significant value and appeal to your home.
While the finished product looks professionally done, the secret to a long-lasting, level surface isn't in the laying of the pavers themselves, but in the meticulous paver base preparation underneath. This guide will show you how to lay pavers correctly, ensuring a project you can be proud of for years to come.
Planning and Design
A successful project starts with a good plan.
-
Choose a Pattern: The pattern you choose will affect the feel of the space. A simple running bond (offset rows like a brick wall) is the easiest for beginners. A herringbone pattern is more dynamic but requires more cuts.
-
Calculate Your Materials: First, calculate the total square footage of your project (Length x Width). You'll need:
-
Pavers: Add 5-10% to your square footage to account for cuts and breakage.
-
Gravel Base: For a 4-inch base, you'll need approximately 1 ton of paver base gravel per 50 square feet.
-
Sand: For a 1-inch sand layer, you'll need about 1 ton of paver sand per 200 square feet.
-
-
Mark Out the Area: Use landscape stakes and string to mark out the exact shape and location of your patio or walkway.
Step 1: Excavation
This is the most labor-intensive part, but it's the most critical.
-
How Deep to Dig: For a standard patio, you will need to excavate about 7 inches of soil. This accounts for a 4-inch gravel base, a 1-inch sand layer, and the height of a typical 2-inch paver, leaving it just slightly above ground level.
-
Ensure Proper Drainage: As you dig, create a slight, almost unnoticeable slope away from your house—about a 1-inch drop for every 4 feet. This is crucial for preventing water from pooling on your patio or running toward your home's foundation.
Step 2: Building the Base
Your pavers are only as stable as the base beneath them.
-
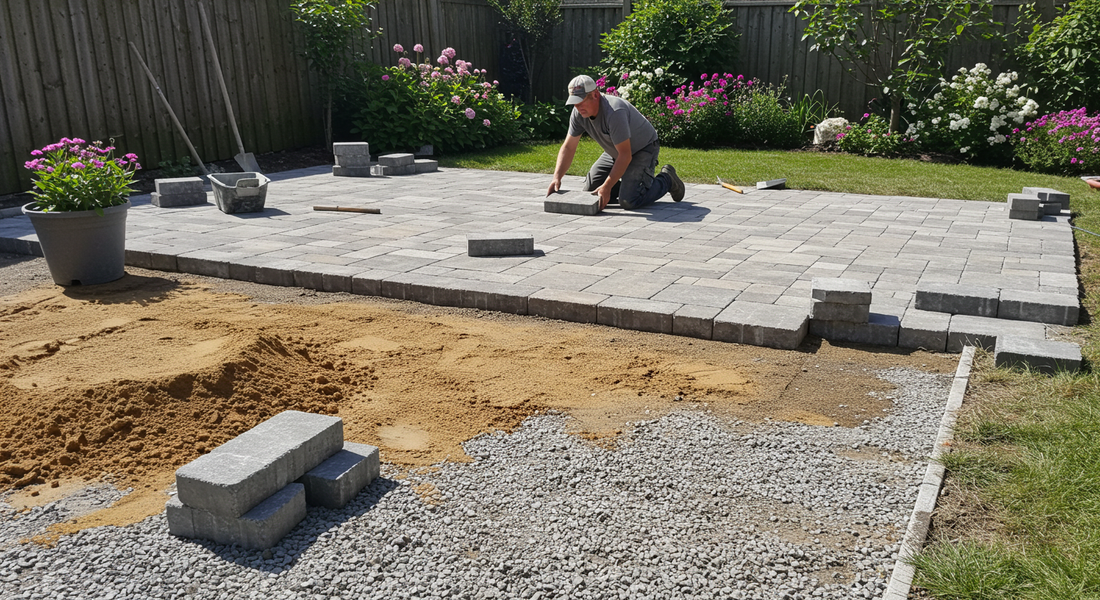
Lay and Compact the Gravel: Add your paver base gravel in 2-inch layers. After adding each layer, use a hand tamper or a rented plate compactor to pack it down until it is completely firm.
-
Add and Screed the Sand: Lay two parallel pipes or 1-inch thick wooden dowels across your compacted gravel base. Shovel the paver sand between them, then pull a straight 2x4 board across the top of the pipes. This "screeding" process creates a perfectly smooth and level 1-inch bed of sand for your pavers to sit on. Remove the pipes and fill in the gaps with sand.
Step 3: Laying the Pavers
This is the fun part where your project comes to life.
-
Start from a Corner: Always begin laying your pavers from a 90-degree corner, preferably against the house. Work your way outwards.
-
Use String Lines: Run string lines along the edges of your marked-out area to ensure your rows stay perfectly straight as you lay your pattern.
-
Cut Pavers to Fit: When you reach the edges, you will likely need to cut pavers. A diamond-bladed wet saw (available at rental shops) will give you the cleanest cuts.
Step 4: Finishing Touches
These final steps lock everything in place.
-
Install Edge Restraints: Dig a small trench around the perimeter of your patio and install plastic or metal paver edging, securing it with the provided stakes. This is essential to prevent the pavers from shifting and spreading over time.
-
Add Polymeric Sand: Once all pavers are in place, sweep polymeric sand over the entire surface, working it into the joints until they are completely full. Use a leaf blower to blow off any excess sand from the tops of the pavers.
-
Activate the Sand: Following the manufacturer's instructions, gently mist the patio with a hose to activate the polymers in the sand. This will cause it to harden like mortar, locking the pavers together and preventing weeds from growing in the joints.
Conclusion: A Project You Can Be Proud Of
Laying a paver patio is a challenging but completely achievable DIY project. By taking your time and focusing on creating a solid, well-compacted base, you can build a beautiful and durable outdoor space that looks professional and will provide a foundation for countless memories for years to come.